Monday, 9 April 2012

History, a Reflection of the Historian Who Writes it.

I have heard it said that all historians do research that reflects their personal or familiar past. I would not want to over generalize about all, since I only know a few historians. But my project this semester definitely reflects my feelings (frustrations) with having been a TA this past year.

I have spent a vast amount of time telling my students to follow Rampolla, and demonstrating the differences between the style for a footnote and bibliography. I have corrected their formating meticulously on all there small assignments, in the hope that they would do it correctly for the large assignments –but this was to no avail.

When I read through their book reports and final essays I got Sparknotes referenced, I had only one page in a book sourced for the whole essay, I got work cited lists instead of bibliographies, and a whole bunch of other mistakes.

So after each assignment I would stand up in front of my tutorial and show where and how you footnote. I would ask them if they understood, and they would all shake their heads in agreement. STILL THERE WAS LITTLE IMPROVEMENT!

Though this picture book is designed for a younger audience, it’s really for all those TAs out there, smacking their head in frustration in their first year students' inability to follow a format. Sure, I know it can be hard if you are using a source that is unusual. But they all used internet or monographs, not some random artefact.

As the semester is almost over, I have a pending dread of marking their final exams.

Here is a link that will take you to the picture book I made. If this becomes supper popular on the web, I have a whole bunch of other villains for Ninja Historian to fight. He can become the Dora the Explorer of the history world.
https://docs.google.com/file/d/0B2TH6TCNbUaidnpOYU9RNnF3b3M/edit

Making it into Book Form:

My picture book is supposed to be a fun (and interactive way if used on an I-pad) of informing people about the need to footnote.


I really enjoyed using the pen tablet, it was supper fun! The most frustrating thing for me was the constant changing of document format, and fitting everything into the same size picture. The reason I found the need to change the format annoying was because the final image had to be a pdf. And since I always make typos it was very time consuming to go back once I thought I was done and reformat an image back to Photoshop, then add a new layer, then rewrite, then condense it back into one layer, then save as pdf, then recreate the large pdf again. And of course, once I think I am done again, I catch another error and have to do the process over again. Thus I think pdfs need to be editable, WORK ON THAT COMPUTER PEOPLE!


The process I took to make all the images and words the same size, so it looks like an open picture book:


1. Make a new document in Photoshop that is 8 × 11 inches.
2. Open a completed picture and flatten the layers, then change name of file.
3. Copy image, and paste onto new document. When I pasted the image it was like 200 times too large since I drew the pictures on a large document since it was easier to do with the pen tablet.
4. Then go to edit , then transform, then scale. Next click on the chain.
5. Next you begin to shrink the size of the image. You can’t just go straight to the roughly 20% size that fits half the page because the image disappears. You have to shrink about 20% at a time so that you can drag the image back into the center of the screen, so you can always find it.
6. Once the image is about half the page you move it to one side of the page.
7. Next you add a layer and click on the text icon.
8. Then you make a text box, and type in the words.
9. Then you flatten the layers, and save the image with a new name.
10. Once all your images are done you go into acrobat pro and create a multi-page file.

Picture and words now one image.

Wednesday, 28 March 2012

Finito Pictures

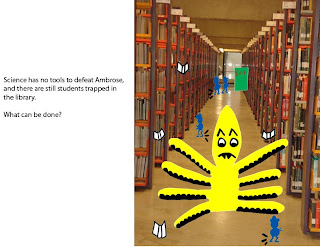
So I have completed drawing and adding a background to the drawings. I really enjoyed the layer feature on Photoshop. Thanks to Sarah I was able to add my drawings and manipulate them on to the photos I took in Weldon.  

 What I did…

  1. I opened both my drawing and the photo in Photoshop.
  2. I used the “magic wand” tool, and then clicked on the empty space on the image that I drew.
  3. Next, I went to select, and clicked inverse.
  4. Then I copied my drawing and pasted it on the photo.
  5. Then I used the “rectangle” tool and made it trace over my drawing that I pasted in the photo. I needed to do this because the image was always too small when I pasted.
  6. Next, I did “command T” to “transform” the image in my rectangle. At this point I could enlarge and move my drawing all over the photo. Sometimes, depending on the image, once I was done transforming the whole drawing I would go back and rectangle off certain parts so that I could alter only a section of a drawing. This was very affective for creating distance in the image. I used it to create space between the Octopus and the Ninja.
  7. Once I was done transforming the image I clicked on the “checkmark”. Then I went to select and clicked on deselect.

 For some images I would add more to the drawing. To do this, I would drag the image onto my tablet. The really nice thing about the layers is that when you want to erase something you have drawn, it does not erase the background.
See how I moved the ninja in the photo with the picture background to create distance.

You click on the layer you want to work on.


For my next step I am going to make a PDF with two pages side-by-side like a picture book, which people will be able to flip through. I think that the picture book format will better suit how I originally outlined my story, when I pictured it like a silent film with text and picture.


Wednesday, 21 March 2012

A few obstacles but back to progressing.

So I was originally planning on making my comic on Manga; however, it has decided not to open for me anymore. Now I am making my pictures on Photoshop which I am quite liking. Between the two programs I tried Adobe Illustrator but I found it VERY hard to draw with, it does not give the illustrator very much freedom with lines on the tablet.


After being frustrated with Illustrator because I had spent a few hours trying to draw a picture, but was not getting anywhere, I decided to switch to Photoshop. I was a tad panicked because I had never used it before, and my Professor was not on campus because it was a Thursday afternoon; so I could not bug him.  Probably the most important thing that I learned from this class is that you can google instructions and tutorials on line for pretty much everything. Thus, I decided to google how to use Photoshop and did a few tutorials.


Along with learning how to use new programs for this project I am also learning how to use a Mac. I am actually starting to like it; the only thing I tend to keep trying to do is Right click the mouse, which does not exist.


Another thing I keep doing because it’s hard to break natural reactions, is touching the button on the pen. The button is right where I naturally hold a pen, so I keep switching my grip without thinking. However, from this constant mistake, I learned that if you touch the pen button while having the tip to the screen a window pops up that allows you to manipulate the width of the pen line, which is very convenient.

 
To speed up the process of drawing, and to make things a tad more consistent from picture to picture,  I made an octopus outline that I saved, so I can use it for different screens.

Here are a few pictures that I drawn so far... However I have no clue how to combine the pictures with images on photoshop for the next phase.
The cover image


I drew the people in blue

Sunday, 11 March 2012

The Historian Hunch


Sometimes when I observe professors at the university I notice that many hunch. I have developed a theory that I shall dub “The Historian Hunch”, though it probably relates to all academics.


To obtain the knowledge needed to achieve a PhD, one is forced to sit at a desk numerous hours of the day, hunched over a book reading. Consequently, as the academic’s mind begins to develop (one may argue to a ‘superior’ state if they are Sheldon Cooper) their body begins to regress into a pre-homo sapien state, to when humans were still hunched over.  

Sunday, 4 March 2012

Story Board...

Story Board.
Some photos have arrows because I decided to change the order of image and words.


Wednesday, 29 February 2012

Planning ...

I think I will be taking a silent film approach to my animated short. I am currently trying to decide where to place the words and the images.

These are some photos I have taken of my work so far.


The beginning of my outline.


I took several photos of the book shelves on the fifth floor of Weldon where my comic takes place.
I am planning on using the images as the back drop because I find it hard to draw with dimensions.